NURBS from Point-Vector

Use NURBS Point and Vector to create splines by point and vector input. Line, arc, and conic profiles can be modeled with a minimum of node points by using interior slope control (using vectors).
Interior slope control means that not only the locations of the interior nodes are controlled, but also the slope of the spline as it passes through the nodes. This slope is controlled upon creation by using vectors instead of, or in addition to, positional input at each node.
You must prepare a string of spline points or nodes, and attach the appropriate slope control vectors if needed. Spline nodes may contain a point and/or a tangent vector. A single point or a single vector, if properly located, is enough to define a node.
Once these point and/or vectors are in place, you are now ready to start inputting the data.
-
Each node may have either a point or a tangent vector or both.
-
The data may be input in any order at the node.
-
Whenever a point is input, it takes priority in defining the node's location.
-
If only a vector is used at a node, the vector supplies the nodes x, y, z location at the vector's base.
Although it is recommended, the vector does not have to reside at a node to deliver data to that node. You may borrow a vector from another location if that vector has the desired direction. However, if no point is input at the node, the base of the vector defines the coordinates of the node.
The direction for selecting nodes along the spline will be in the same direction that the spline will be defined. You must start at one end of the spline and proceed along, not jumping or skipping nodes. There is no pro vision for randomly inputting nodes from all over the spline.
When viewing the section menu from the Point/Vector module, you are asked what type of node entity is going to be selected next. Since each node may have a point and a vector, the software does not increment to the next node until you repeat an entity type. At each node the point and tangent buffers are zeroed, and then filled as data is supplied.
-
Control Points can be modified through the Edit dialog that appears when a NURBS spline is selecting using the Generic Edit function.
Using the function:
-
Select NURBS from Point-Vector from the Create>Splines submenu.
-
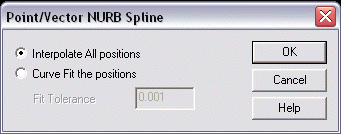
The Point/Vector NURB Spline dialog box appears, through which you are able to specify whether to Interpolate All Positions or Curve Fit the Positions.

Interpolate All Positions – When checked, the spline will pass exactly through all of the positions (and will become nodes of the spline).
Curve Fit the Positions – When checked, not all positions will become nodes in the spline. The Curve Fitting process can reduce the number of nodes in the spline by eliminating certain nodes which are no further from the spline than the curve fit tolerance. You are able to specify that Curve Fit Tolerance value when this setting is enabled (checked).
-
Once you have specified the dialog settings, click OK.
-
Choose the option for selection of the first node.

If you have only a point at one node and only a vector at the next node, you must manually increment the counter by choosing the NEXT NODE option on the menu.
If you fail to increment the counter by choosing the NEXT NODE option, the system will combine all the data at the present node until one of the node entity types is repeated.
Usually, you have prepared the same data at each node. A typical input mode is to develop only the tangent vectors properly located at each node. If this is the case, you then choose the TANGENT input option from the main Selection Menu, and then screen select the vector. Since you will be repeating a menu choice and entity selection, the system automatically increments to the next node to receive the data.
-
Choose the option for selection of the second node.

-
To continue selecting nodes, choose a method or select NEXTNODE. When you are finished selecting nodes, click DONE. The spline will then be created.