2D Auto

Use this function to create a 2D spline automatically through a path of minimum distance point entities, projected to the current construction plane. View the Start and End Condition Menu options that appear in the Conversation Bar frequently throughout spline creation.
When using this function, keep the following in mind:
-
The first position or point, second position, and optional end position of an automatic spline can define its start and end positions. These positions act as a direction guide for creation.
-
This option is easier to use when you have at least two points on the screen.
-
A spline is created until it reaches the indicated end point or position.
-
The spline is created through the start point or position and second point or position you select, then through the next nearest point projected, and so on.
-
Delete or move any point entities not included in the spline to an un-displayed level. This increases processing speed and ensures that the spline passes through the correct points when created.
Using the Function:
-
Click Create>Spline>2D Auto.
-
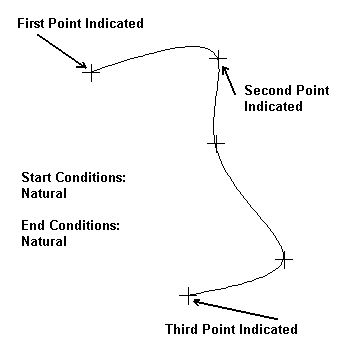
Change to the selected construction view and depth and indicate the start, second, and end spline positions.
NOTE: If you choose AUTO after selecting the second position, the spline ends at the last point in the sequence. If a third, or end, point is selected, the spline will end at that point.
-
Choose the start and end condition for the spline from the Start/End Condition Menu. Regardless of how you set the 2D/3D construction switch, the indicated points are projected to the current construction plane, and the spline is created in the current construction plane.
The figure below shows an example of a spline created with the 2D Auto function.
