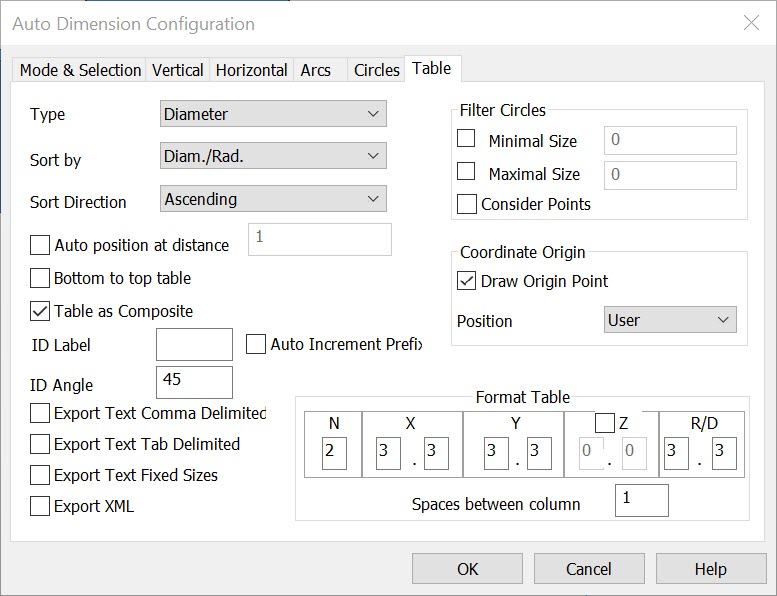
Table
The available settings in the Table page of the Auto Dimension Configuration dialog box allow you to specify the parameters by which the Auto Dimension feature can generate circle table dimensions. The available settings are explained in the following segment. Note that the settings contained in the Table page will be un-selectable unless Circle Table is first enabled under Dimension Type in the Mode & Selection page.
Dialog Options:

Type
Select a type from the available options: Radius or Diameter. When Radius is selected, Auto Dimension will generate a radius dimension. When Diameter is selected, Auto Dimension will generate a diameter dimension.
Sort By
Specify a field by which the table will be sorted. The following options are available from the drop-down menu: Diam./Rad. (diameter and radius), X Coord (X coordinate), Y Coord (Y coordinate), and No Sort (no sort applied).
Sort Direction
Indicate a sort direction in which the table will be sorted. The two available options are: Ascending (sorted in ascending order) and Descending (sorted in descending order).
Auto Position at Distance
When checked, the table will automatically be positioned as shown in the tables below. In these tables, X Max refers to the largest X Coordinate in the Table, Y Max refers to the largest Y Coordinate in the Table, and Y Min refers to the smallest Y Coordinate.
|
Table Type |
X Coordinate of Table |
Y Coordinate of Table |
Table Anchor Position |
|
Top to Bottom |
X Max + "Distance from Part |
Y Max |
Upper Left Corner |
|
Bottom to Top |
X Max + "Distance from Part" |
Y Min |
Lower Left Corner |
If the checkbox is not checked, the Table will be placed as shown below:
|
Table Type |
X Coordinate of Table |
Y Coordinate of Table |
Table Anchor Position |
|
Top to Bottom |
User (by animated rectangle) |
User (by animated rectangle) |
Upper Left Corner |
|
Bottom to Top |
User (by animated rectangle) |
User (by animated rectangle) |
Lower Left Corner |
Bottom to Top Table
When selected, the table will be read from bottom to top.
Table as Composite
When selected, the table will be generated as a composite.
Filter Circles
These settings allow you to apply a filter to the dimensions being automatically created. The filter parameters that can be configured are explained below.
-
Minimum Dimension – When checked, you are asked to specify a value in the editable field. Any EndEnt that would cause creation of a dimension less than the set value will be ignored.
-
Maximum Dimension – When checked, you are allowed to specify a value in the editable field. Any EndEnt that would cause creation of a dimension greater than the set value will be ignored, and the ignored position will become the 1st position for the next dimension created.
Coordinate Origin
The settings under Coordinate Origin allow you to elect to Draw Origin Point and specify a Position Origin. These settings are explained below.
-
Draw Origin Point – When checked, a point will be created on the origin.
-
Position Origin – Allows you to specify a position for the origin of the table. The following positions are available from the drop-down menu: Absolute, LL Part, LR Part, UL Part, UR Part, and User (user defined).
Format Table
Use these available settings to determine how the table will look.
-
N – This controls how much space is allotted for the column, which displays the number of each circle. Example. If "Spaces between columns" is 4, and "N" is 3, then the N Column will be 7 spaces large.
-
X – This controls how much space is allotted for the column that displays the X Coordinate of each circle. The first number corresponds to the number of spaces allotted to the whole number portion of the coordinate, while the second number corresponds to the number of spaces allotted for the decimal value of the coordinate.
Example:
If the Spaces Between Columns setting is set to 4, and X is set to 4.4, then the entire column will be 13 spaces wide (4+4+1+4) +1 is for the decimal point, and there will be a 4-digit precision.
-
Y – This controls how much space is allotted for the column, which displays the Y Coordinate of each circle.
-
Z – These controls will be active only if the checkbox is checked. In this case the column with the Z coordinate will be included following the parameters set. This controls how much space is allotted for the column, which displays the Z Coordinate of each circle.
-
R/D – This controls how much space is allotted for the column, which displays the Radius/Diameter value of each circle.
-
Spaces Between Columns – Enter a value to determine the amount of white space in a table column. Half of the number you specify will be placed before the data in a column, and half will be placed after it.
Export Options
If the AutoDim/table needs to be exported after creation , (Execute AutoDim or Coordinat Table) choose the format for the export by checking the desired option for export.