Status Bar
Status Bar
The Status bar will appear at the bottom of the workspace when it is displayed. Unlike the other settings displays in the View pull-down, the Status bar cannot be moved or floated. The Status bar contains the name of the function that is currently in use (displayed on the left side of the bar) and a descriptor of the function or Menu bar option if the cursor is currently positioned over one.
The first pane of the status bar displays the name of the current function. If an experiment is in effect, then the colors will be inverted (gray on black instead of black on gray, for example).

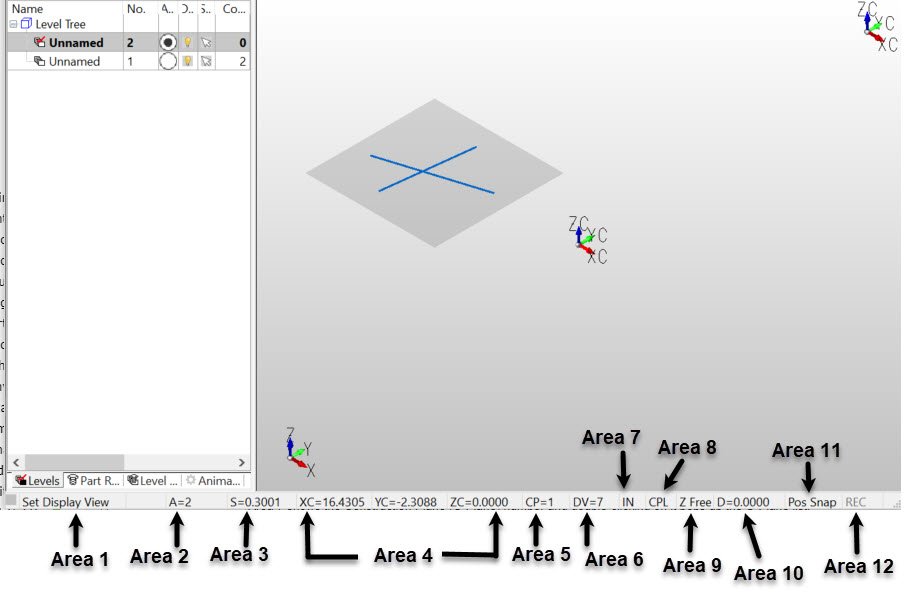
The Status Bar is broken into 12 separate areas. From left to right these areas are:
Area 1 displays the ToolTip of the active function or function icon submenu. If an immediate mode function is active the background of this area will be black.
Area 2 shows the active level number and double-clicking on it starts the Set Active Level function.
Area 3 shows the viewport scale and double-clicking on it starts the Set Scale function.
Area 4 displays the X, Y, Z coordinates of the cursor when over a graphics viewport.
Area 5 shows the Construction Plane (C-Plane) number and double-clicking on it pops up the C-Plane list.
Area 6 shows the active Display View number and double-clicking on it pops up the View list.
Area 7 displays the part units (IN, mm, etc.)
Area 8 shows the status of the CPL/WLD coordinate switch (C-Plane or World). Double-clicking on it toggles the setting.
Area 9 shows the status of the 2D/3D switch (Z Free). Double-clicking on it toggles the setting.
Area 10 shows the value of the Depth setting and double-clicking on it starts the Set Depth function.
Area 11 displays the active Snap mode.
Area 12 displays the Macro Record status. When the Macro functions are engaged these buttons will display REC and PAUSE, respectively.
Unlike most other screen elements, the Status Bar cannot be relocated or floated.
