KeyCreator / Tools / Customize / Toolbars / Creating a Custom Toolbar
Creating a Custom Toolbar
When you click Tools>Customize, the Customize dialog appears. Contained in this dialog are options that allow you to create and name a toolbar, as well as a Commands pane from which you can drag any of the available program icons to a custom toolbar using the method described below.
Note that to add display controls to the default Parts Settings toolbar in one operation, see Adding Display-Control Buttons to Part Settings Toolbar.
Drag and Drop Toolbar Creation:
Follow the steps in the example below to create a custom toolbar using the drag and drop method. In this method, program icons can be dragged from the Commands page of the Customize dialog or from the History Bar onto your custom toolbar.
-
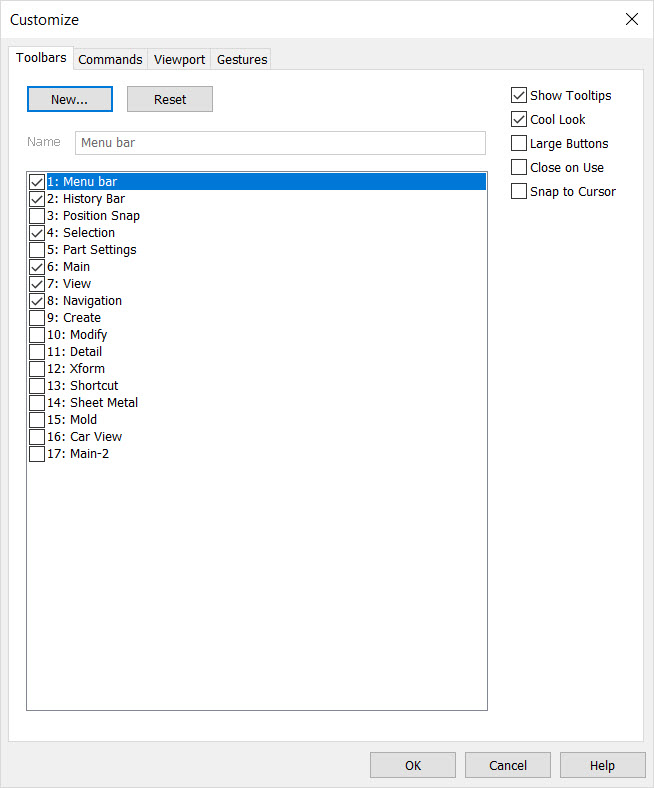
Select Customize>Toolbars from the Tools menu.
-
Select the NEW button. You will be asked to create a name for the new toolbar. For instance, "Example." A new toolbar with the name you assign to it appears in the workspace and is empty until you add icons to it.
-
Once the toolbar has been created, click on the Commands tab of the Customize dialog.
-
Locate the category from the scroll list containing the icons you wish to add to your toolbar. For example, if you wanted to add the File>New icon, you would select File. The program icons available for that function group appear beside the scroll list under Buttons.
-
One at a time, select a program icon and drag it to the new toolbar you have created. Note that when you drag an icon (button) and drop it outside of the new toolbar, another toolbar will automatically be created containing that icon. See Customization Hints for more information.
The Tools>Customize>Toolbars dialog, where a new toolbar called "Example" has been created

The Tools>Customize>Commands dialog, where Position Snap has been selected. (Note the Position Snap commands under "Buttons".)

An example of a toolbar, whose buttons were dragged and dropped from the Tools>Customize>Commands>Position Snap category, selected from the scroll list.
Customization Hints:
When dragging and dropping a program icon (button) to a toolbar, it will be important to remember the following:
-
When the Commands tab of the Customize dialog box is not active, because either the dialog isn't open or because it is on the Toolbars tab, you will need to hold down the ALT key and drag an icon to move it. Or, if you hold down the CTRL+ALT keys before you start dragging, a copy of the button is made and the original stays in its current location. Be sure to press the keys before you start dragging. You can use the ESC key to cancel a drag. When dragging a button off of the History bar it will always be a copy. You cannot drop buttons onto the History bar.
-
If you drop a button over a toolbar, the button will be added to that toolbar.
-
If you drop a copy of a button anywhere else, a new toolbar will be created with an assigned name, such as "Toolbar 2." You can either keep the assigned name, or rename the toolbar.
-
If you drop a non-copied button anywhere else, the button will be deleted.
-
If you drag a button on an existing toolbar a small distance away from an adjacent button, a separator will be created between those buttons.
-
If you drag a button next to a separator a small distance toward the separator, the separator will disappear.
-
To turn a toolbar off, go to Tools>Customize>Toolbars and de-select (remove check from) the checkbox of the toolbar you no longer want to display.
-
Toolbars can be toggled on and off by right mouse clicking in the Menu bar, Palette Menu, or on the toolbar itself.
-
Removing all of the icons from a custom toolbar will remove it from display, and delete it from the Toolbars list.
-
Toolbar buttons, keyboard assignments, and mouse button assignments can not be created directly from the categories in the list, only from icons within the categories, even if the categories correspond to a palette button. The palette buttons themselves have their own categories. For instance, for the "Create-Line" button on the Modeling palette, you would select the Modeling-Create category, and select the Create Line icon.
|