KeyCreator / Tools / Machinist / Special / 2XWireEDM
This special function provides the necessary tool path setup information for a 2 axis wire EDM (Electrical Discharge Machining.) The tool path can be created from either wireframe or solid geometry (open or closed planer profiles.) A set of dialogs are provided for setup of toolpath options. Wire EDM Setup Dialog 1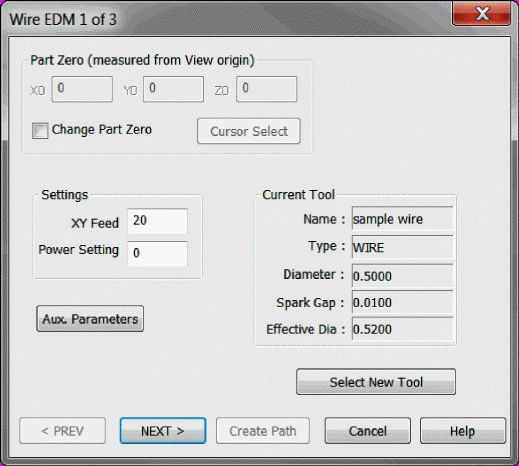
Part ZeroX0/Y0/Z0 - Displays the currently set home position the stock part. When Change Part Zero is selected these values can be manually changed in each cell or by using the Cursor Select button.
Change Part Zero - To alter the currently set Part Zero, check this box and make adjustments and then uncheck. SettingsXY Feed - The rate of motion in current part units for the cut cycle. Power Setting - User input as per Wire EDM cutting technology conventions. Aux. Parameters - An extended set of parameters that can be applied to the dialog settings. This file is located in the Post folder within KeyCreator (2XWEDM.prm.)
Next-After completing the setup for this dialog choose Next to proceed to the next Wire EDM dialog (2 of 3) or cancel to end the 2X Wire EDM session. Wire EDM Setup Dialog 2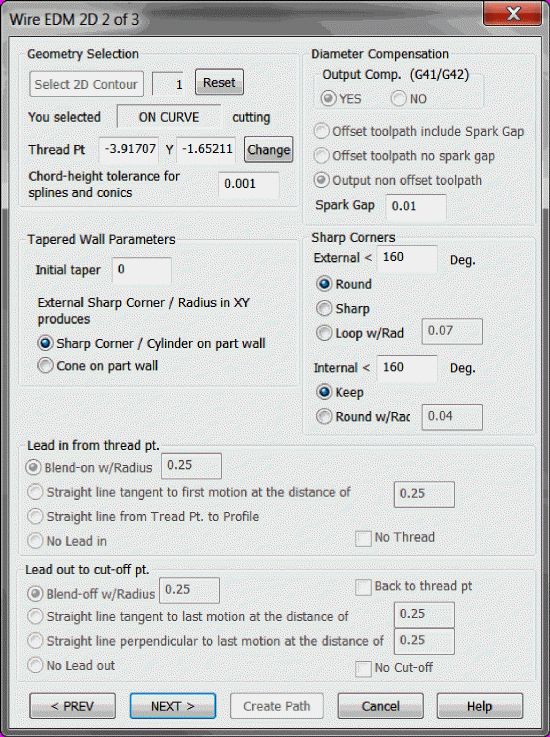
Geometry SelectionSelect 2D Contour - Select this button to select the profile geometry used for the cut path. The conversation bar will prompt for selection of the profile curves, cursor select each curve from the start cut position curve and in order of cut direction. After selecting Accept the conversation bar will prompt for a 'Revers machining direction', note the vector indicator displayed on profile path. Once the path direction is set choose Accept and a 'side of path ' prompt will appear in the conversation bar, choose a side (or on curve for center cut on profile curve) and choose Accept which will open the dialog and populate the 2D contour settings. These settings can then be edited as needed or use the Reset button to zero out all input. The user should review and account for the tabs entries and insure that the geometry selected is correct. Thread Pt - Indicates the X/Y entry point obtained from the first pick in the Select 2D Contour curves. If this value is not what is needed choose the Change button to select a new thread point. Chord-height tolerance for splines and conics - This sets the refinement of the curvature, the smaller the value the more accurate the cut path (typically set at 0.001.) Diameter CompensationOutput Comp. (G41/G42) - Choose yes to create G41/G42 codes allowing for operator set compensation, choosing No will disable the 3 offset options. Offset tool path options - If Yes was selected for the Output Comp then Output non offset toolpath will be checked by default. At this point the user can choose to offset include or disregard spark gap (Spark Gap provided for any edit at this point in the setup.) Tapered Wall ParametersInitial taper - Enter a degree value for any taper which exists on initial entry of stock part. External Sharp Corner/ Radius in XY Produces - This is a machine setting that dictates how constant tapering will behave. Choose which method is used when dealing with either of these external conditions. Sharp Corners
External < X Deg. - Set the external sharp corner threshold and then choose from the available methods, Round the Internal < X Deg. - Set the internal sharp corner thresh hold and choose to keep sharp or round to set radius value. Lead in from thread pt.Blend-on w/Radius - When selected, specify a blend-on radius. The blend-on radius must be greater than the tool radius. Straight line tangent to first motion at the distance of - Enter the distance value for linear movement tangent to the circular lead in. Straight line from Thread Pt. to Profile - Lead in defined as straight line motion from thread point. No Lead in - Turns off lead in motion. No Thread - Indicates a non-thread method will be used in the Wire EDM procedure. By default a thread code would be generated at beginning of toolpath check this to omit this code. Lead out to cut-off pt.Blend-off w/Radius - When selected, specify a blend-off radius. The blend-off radius must be greater than the tool radius. Back to thread pt - Checked will specify a return to thread point after lead out. Straight line Tangent to last motion at the distance of - Enter a distance value for linear movement tangent to circular lead out. Straight line perpendicular to last motion at the distance of - Lead out distance value specified as straight line perpendicular to last cut motion. No Lead out - Turns off lead out motion. No Cut-off - By default a cut wire code will be generated with the tool path. Checking this option will omit this code in tool path. Next/Prev/CancelOnce setup is complete for this dialog choose Next to proceed to the next Wire EDM 3 dialog, Prev to open the first Wire EDM dialog or cancel to end the 2X Wire EDM session. Wire EDM 3 Dialog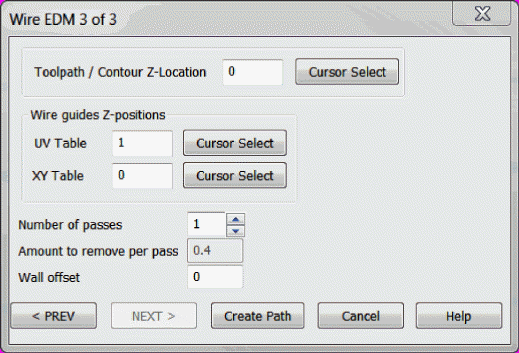
Toolpath / Contour Z-Location - Indicate z location start point (used to determine UV offset which in turn is used to calculate angle/taper.) Wire Guides Z-positionsUV Table - This setting is usually slightly higher then the part thickness and is involved in determining the correct taper angle. XY Table - Represents the z0 plane location. Number of Passes - Choose the number of passes needed to remove material. Amount to remove per pass - Choose the amount of material to remove per pass. wall offset - User input value to offset cut from part wall ( how much stock to leave on wall after tool pass.) Prev/Create PathOnce all settings have been verified choose Previous to go back to the 2nd dialog, Create Path to proceed to path creation or Cancel to exit the function. Create Path will prompt for a toolpath description, enter the description and choose create and the toolpath will appear in display. |