KeyCreator / Tools / Customize / Toolbars / Toolbars PaneToolbars Pane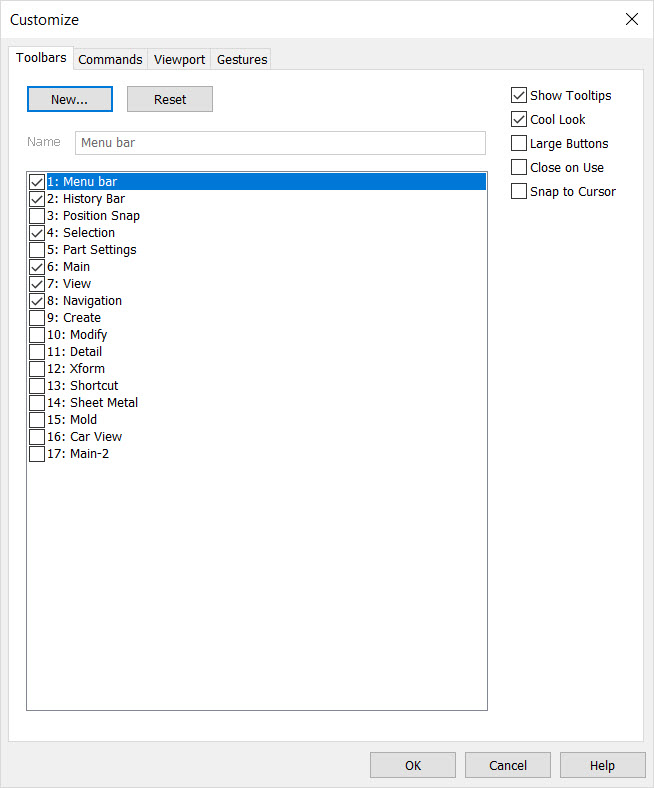 ToolbarsThe default toolbars are listed here, in addition to the custom toolbars that you create. To display a toolbar in KeyCreator, click on the appropriate checkbox. Toolbars are completely configurable, and through this dialog box you can control which toolbars are shown, and determine what program icons they will display. You can add as many new toolbars as you want. Toolbars will dock to the edges of the main window as they do in other Windows applications, but they can also be floated. This flexibility allows you to display multiple toolbars in the program workspace. The number of toolbars you can display is limited only by the available screen space. NOTE: There is no fixed size for the toolbars. Toolbars will be as long as their icons require them to be; no longer, no shorter. When floating, toolbars can be dragged to create multiple rows. Toolbars will not dock if the CTRL key is suppressed while they are dragged. Show ToolTipsWhen selected, ToolTips will be displayed when the cursor is dragged over a toolbar icon. Note that this setting is independent from the Position Snap ToolTips setting under Tools>Options> Selection. Cool LookWhen selected, buttons contained within toolbars will appear flattened. When Cool Look is enabled, the gripper bar will appear on the Classic Menu, Conversation Bar, Tree Window, Settings Window, and palettes. Cool Look is saved in the workspace. Large ButtonsWhen checked, function icons will be displayed at a larger size, for use on large monitors. This setting is saved in the workspace. Close on UseWhen checked, clicking on a button in a floating toolbar will cause that toolbar to close (turn itself off). Snap to CursorWhen checked, and when a toolbar is turned on using one of the toolbar toggle functions and was floating when it was turned off, the toolbar will be re-positioned so that its center is directly beneath the cursor. NEWSelect the NEW button to display the New Toolbar dialog box. You are required to enter a name for the new custom toolbar you are creating. Once you have named the toolbar, press OK. The empty toolbar then appears. You can now drag and drop icons from any of the other toolbars, from the History Bar or from the Command tab of the dialog box onto your new toolbar. RESETSelect the RESET button to set the selected toolbar back to its default content. DeleteThe delete button appears when a custom toolbar is selected, and is used to delete a custom toolbar. |