KeyCreator / Modify / Warp / Position

Use this feature to select a location on a solid and drag it to another location, thereby warping the solid in the immediate region chosen by the first point selected. This causes a bulging effect on the model, where face and edge types can potentially be changed.
HINT: Display the solid using the Shaded rendering mode so that the dynamic dragging can be easily seen.
Using the Function:
-
Select Position from the Modify>Warp submenu.
-
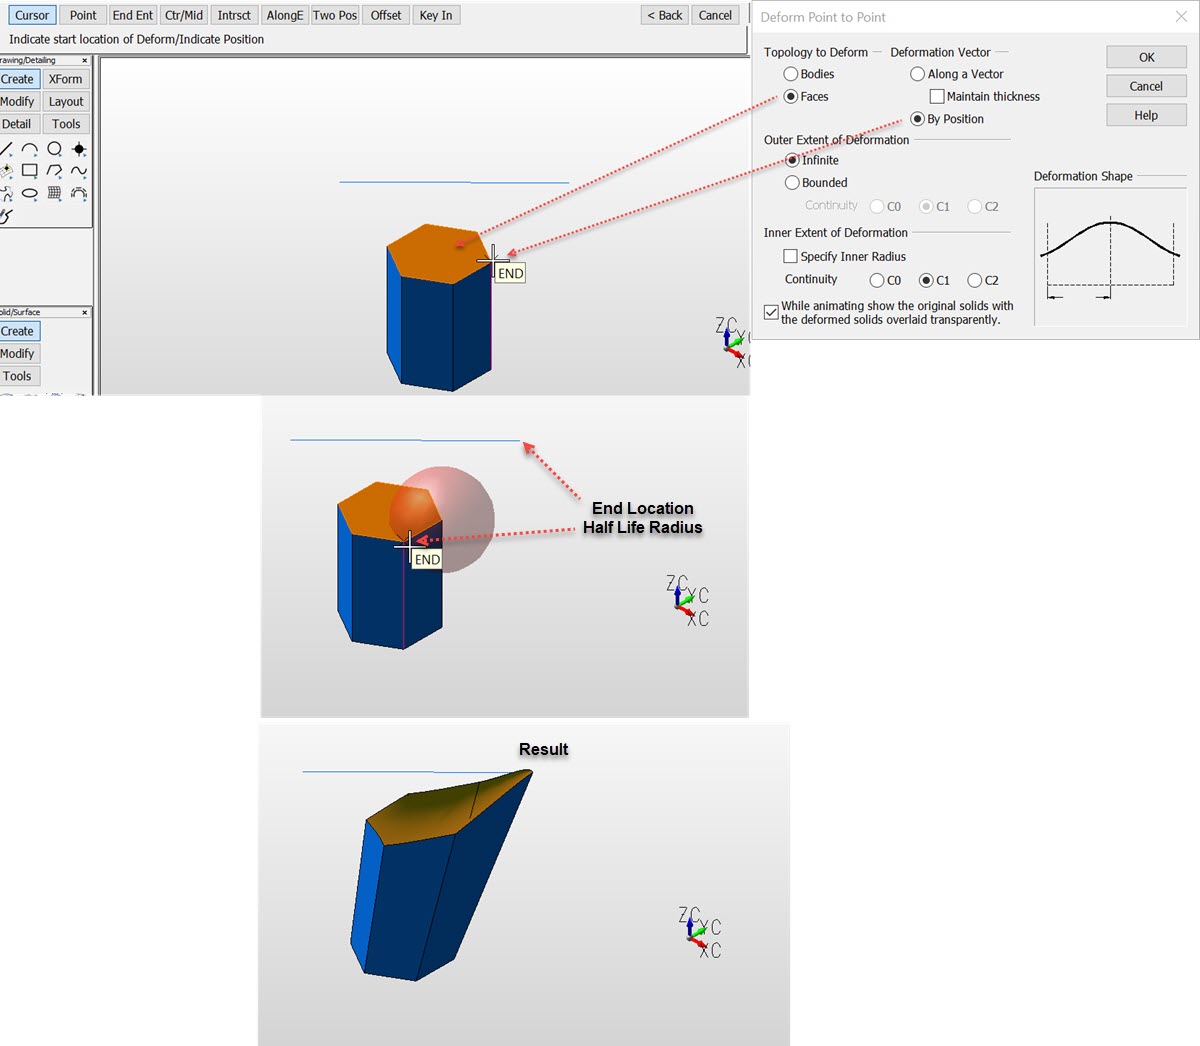
The Deform Point to Point dialog appears. Configure the available dialog settings, and click OK.
-
Select the body to deform.
-
Indicate the start position for the deformation, using the UPM.
-
Define the deformation direction: 2Points, Line, Vector, Tangent, Perpendicular to Plane, or Key In.
-
Indicate the half-life radius by dragging the visible deformation using the mouse cursor.
-
Indicate the end location of the deformation.
Dialog Options:
Topology to Deform
-
Bodies – When selected, you will be prompted to select bodies to deform.
-
Faces – When selected, you will be prompted to select faces to deform. When Faces is selected, faces adjacent to the selected face might need to be trimmed or extended to maintain a closed solid.
Deformation Vector
This option allows you to determine the direction of the wrap.
-
Along a Vector – When selected, you will be prompted to select a vector.
-
Maintain Thickness – When Along a Vector is selected, you can elect to maintain the thickness of the model. This will cause the warp to deform cylindrically instead of spherically.
-
By Position – When selected, you will be prompted to specify a position.
Outer Extent of the Deformation
This option allows you to control how the warp will affect the model, either at an infinite or finite distance.
-
Infinite – When selected, you are required to define an outer radius. This radius is considered the half-life of the warping effect.
-
Bounded – When selected, you are required to define an outer radius. This is the absolute distance of the warp.
-
Continuity – When Bounded is selected, you can elect to specify a C0, C1, or C2 level of continuity at the boundary.
Inner Extent of the Deformation
-
Specify Inner Radius – When selected, you can define a radius. KeyCreator will not to warp the region within the defined radius.
-
Continuity – Specify a C0, C1, or C2 level of continuity for the inner boundary.
While animating show the original solid…
When selected, the warping facets will be displayed transparently, so that both the original and modified solids can be seen simultaneously until the final warp position is selected.
Example Warp Position:
|