Create a New Welding Symbol Dialog OptionsKeyCreator Prime / Detail / Tolerance Symbol / Weld / Create a New Welding Symbol Dialog Options
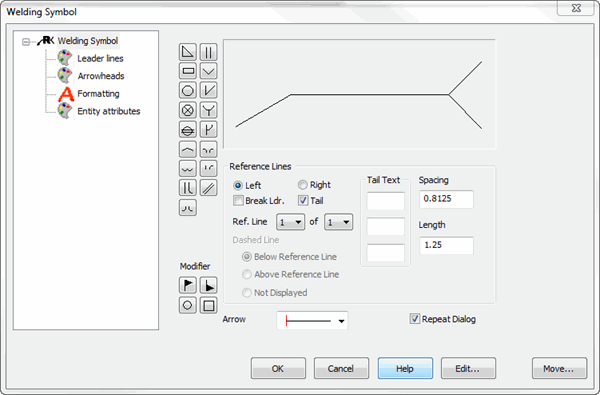
The Create a New Welding Symbol dialog appears when Welding Symbol is selected from the Detail>Tolerance Symbol Ribbon area. This dialog contains two dialog tabs, Welding Symbol and Attributes. The contents of the Surface Texture dialog page are listed below. The Attributes and Formatting panes are identical to the common panes used elsewhere in KeyCreator.
Dialog Options:
Welding Symbol
Select a symbol from the available symbol buttons to the right of the dialog. A preview of the selected symbol will appear in the preview window with additional modifier options:
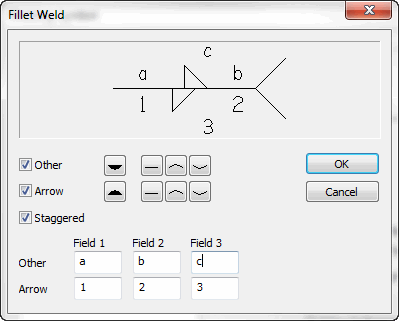
Other- Checked on, applies weld symbol topside and you can add the additional modifiers to top side.
Arrow- Checked on,applies weld symbol to underside and you can add the additional modifiers to underside.
Staggered- Checked on will turn on top and underside symbol and stagger them automatically.
Additional Fields- Placement of additional characters can be added as seen above.
Reference Lines
Specify a direction for the reference lines by selecting either Left or Right. If Break Ldr. Is selected, the leader will be broken, and display an elbow at a break point that you specify
-
Break Ldr – When selected, the leader will be broken, and an elbow will appear at the break point that you specify.
-
Tail – When selected, the symbol will have a tail (see the preview window to view the tail).
-
Ref Line – Determine the number of reference lines by selecting a value from the drop-down menu. The maximum is five (5). Use the first pull-down list to choose the current reference line, and the second to choose the total number. Line #1 is always on the bottom and the line numbers increase in the upward direction. The line you designate as the current line will be highlighted in the preview area.
-
Dashed Line – You can select the position of the Dashed Line (Below Reference Line, the default, or Above Reference Line) relative to the reference line. Or, you can select Not Displayed to "not display" the reference line. Dashed lines are not used for ANSI welding symbols. Thus, all options in the Dashed Line section on this pane are unavailable when you select ANSI. (You select the symbol standard in the Standards field on the Annotations>Formatting pane of the Detail Options dialog (Detail>Settings>Options>Annotations>Formatting.)
-
Tail Text – When the Tail checkbox is checked, you are able to add three short lines of text, in an upper, middle, and/or lower position, by entering text in the text fields provided. These three text positions correspond to the positions of the three text fields. In other words, text in the uppermost field will appear in the uppermost position next to the welding symbol tail, the text in the middle field will appear in the middle, and the text in the lowest field in the lowest position.
-
Spacing – Specify a value for the spacing between reference lines.
-
Length – Specify a value for the length of reference lines.
Modifier
Specify a Modifier by click on one of the available button options. The following modifiers are available: Melt Through, Flat, Convex and Concave.
Arrow Style
Select an arrow style from those available in the drop-down menu.
Repeat Dialog
When checked, the dialog will re-appear once you have placed a welding symbol.
|