|
KeyCreator Drafting / File / Export / PDF Export
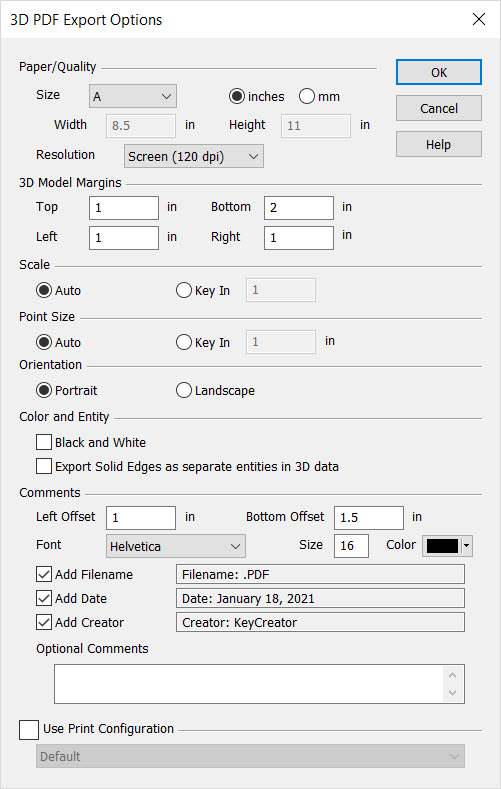
When you click File>Export>PDF>Options, the PDF Export Options dialog box appears, as shown and described below (3D Options listed here).
Dialog Options:
Paper/Quality: Determines the size and resolution (quality) of the paper on which to print Select the size paper on which you are printing. Width and Height: If you selected Key In in the Size field, type the width and height of the paper on which you are printing. Resolution: Select the desired screen resolution. 3D Model Margins: Adds user defined margins to the exported 3D model. Scale: Determines the ratio of part size to paper size Auto – Scales the part to reach the extents of the paper margins automatically Key In – Allows you to enter a plotting scale value manually. Take, for example, the case where the model is one-inch wide and the paper on which you are printing is eight-inches wide. If you type 7 in the Key In field, the model is printed seven times larger on the paper. It would be seven-inches wide on the eight-inch wide paper, leaving one-half inch on each side. Point Size: Use to specify the size of a printed point entity. Auto - Select so that the Point Size field setting on the Set Configuration Options dialog determines the size of the printed point entity (Tools>Options>Display). Key In - Select if you want to specify the size of the printed point entity by typing the value in inches or millimeters. Once you type the in value and press the TAB key, the mm field is populated with the equivalent value, and vice versa. Orientation: Select whether the paper on which you are printing is portrait orientation or landscape orientation. Color: Determines whether the colors on the model are retained when printing (Black and White check box cleared) or changed to black and white (check box selected) Comments Area: Apends selected items listed (filename, date and creator/author) including any user defined comments to the bottom of the PDF. Unchecking options and leaving no user defined comments will remove a comments section from saved pdf file. Use Printer Configuration: Selecting a print configuration in this field causes the applicable settings of the Print/Plot configuration (Tools>Options>Print/Plot) to be used for the export. See Print/Plot for details. Each print configuration has a name. You define the print configuration using the New Configuration or Import Configuration button on the Set Configuration Options dialog at Tools>Options>Print/Plot. This determines the selections that appear in the Use Printer Configuration field on the PDF Export Options dialog. The settings on the selected print configuration that are used for 2D PDF export are as follows: General Pane: Only the Scale, Point Size, Dash Spacing, Paper Orientation settings Color Pane: All settings Width Scale Pane: All settings Dash Scale Pane: All settings Stamping Pane: All settings Calibration Pane: Not used The settings on the selected print configuration that are used for 3D PDF export are as follows: General Pane: Only the Scale and Paper Orientation settings Color Pane: All settings The settings on the remaining panes are not used
|