Using the Point/Vector FunctionKeyCreator / Create / Surface / Point/Vector / Using the Point/Vector Function
To use this option you must prepare a grid of surface points or nodes and attach the appropriate slope control vectors if needed. Surface nodes may contain any combination of point, tangent, or cross vectors. A single point or a single vector, if properly located, is enough to define a node.
The Point/Vector surfacing algorithm establishes a smooth set of flow curves through the rows of node points to define the surface flow. The algorithm also uses the vector data at the nodes to control the direction of flow.
Vectors play an important role in surface construction. For this reason, Solids has included several functions addressing vector capability. See Create Vector and Modify Vector for more information.
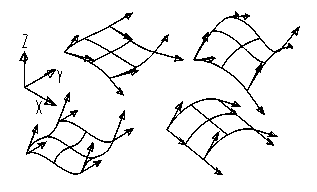
Four surfaces formed with different tangent and cross vector directions. Notice how surface slope is constrained by forcing the surface to be tangent to the vector.
Upon entering the Point/Vector routine, you will be prompted for the number of nodes in the U direction along each spline. Each spline must have the same number of node points. The node point and vector data does not have to lie in a straight line or plane. Since this data is used to define splines along the surface, it may traverse any reasonable path necessary to model the surface.
-
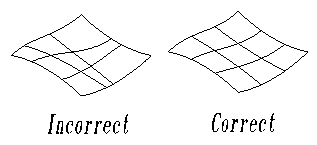
Examples of correct and incorrect node point spacing. Careful attention to proportional node spacing will provide more consistent results in the interior of the surface.
-
Evenly spaced surface flow curves are a priority for good surface building. If the surface does have regions where the flow curves must converge or diverge, careful attention to proper spacing between the rows of nodes will better capture the desired surface shape.
-
The next prompt is for the number of nodes in the V direction. This will be the number of spline or flow curves that will be developed.
-
You will now be ready to start inputting point and/or vector data. Here are the requirements:
-
Each node may have any combination of a point, tangent, or cross vector.
-
Data may be input in any order at the node.
-
When a point is input, it takes priority in defining the node's location.
-
If only vectors are used at a node, the first picked vector supplies the nodes x, y, z location at the vector's base.
-
Vectors do not have to reside at a node to deliver data to that node. The user may borrow vectors from another location if that vector has the desired slope. However, if no point is input at the node, then the base of the first picked vector defines the coordinates of the node.
-
The sequence or direction of selecting nodes along the rows must be the same from row to row. You must start at one of the natural corners of the surface and proceed along the chosen row, not jumping or skipping nodes. The next row of nodes is input and so on. There is no provision for randomly inputting nodes from all over the surface.
-
When viewing the Selection Menu from the Point/Vector Create module, you will be asked what type of node entity is going to be selected next. Since each node may have a point and two vectors, Solids does not automatically increment to the next node until you repeat an entity type, or until all node entities are present. At the beginning of each node, the point, tangent, and cross vector buffers are zeroed and then filled as data is supplied.
-
If you have only a point at one node and only a vector at the next node, then you must manually increment Solids to the next node by choosing the NEXTNODE option on the menu.
-
If you fail to increment the counter by choosing the NEXTNODE option, the system will combine all the data at the present node until one of the three node entity types is repeated.
-
Usually you have prepared the same data at each node. A typical input method is to develop only the tangent vectors properly located at each node. In this case, you then merely choose the TANGENT input option from the main Selection Menu, and then select the vector. Since you will be repeating this menu choice and vector selection, the system automatically increments to the next node to receive the data.
-
At the end of the row, you may choose NEXTNODE or continue in the same manner, choosing TANGENT.
|